
PrintFactory Software Initial Setup Guide
2. PrintFactory Basic Preference Settings: Language and Unit of Measurement
2.1 Launch PrintFactory RIP Software
On your computer desktop, find and double-click the PrintFactory RIP software icon to launch it.

2.1-Launch-PrintFactory-RIP-Software
2.2 Access Preferences
In the upper left corner of the PrintFactory software interface, find and click “Edit”. In the drop-down menu that appears, select and click “Preferences”

2.2-1-Click-Edit

2.2-2-Select-Preferences
2.3 Set the Unit of Measurement
In the “Preferences” window, click the “Unit” tab. From the drop-down options, select “Millimeter (mm)” as the unit of measurement (recommended). You can also adjust the unit according to your usage habits to suit your daily work routine.

2.3-1-Click-Unit-Tab

2.3-2-Select-Millimeter
2.4 Set the Software Language
In the “Preferences” window, click the “Language” tab. From the language list, select your preferred language.
Note: After changing the language, you must close the PrintFactory software and restart it for the language setting to take effect.

2.4-Click-Language-Tab
2.5 Confirm and Save Settings
After selecting the language and unit of measurement, click the “OK” button at the bottom of the window to save the settings.
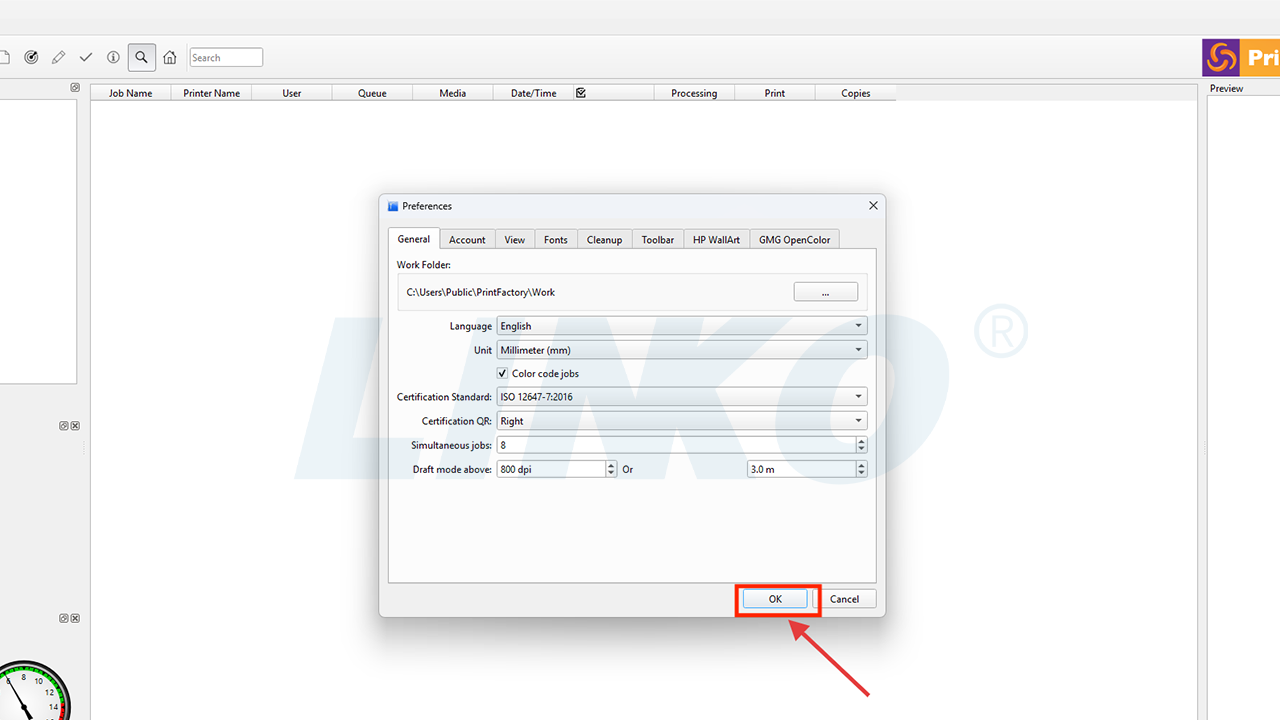
2.5-Click-OK
2.6 Restart PrintFactory RIP Software (If Language Was Changed)
Close the PrintFactory software. Return to your computer desktop, find and double-click the PrintFactory RIP software icon to restart it.

2.6-1-Close-Software-After-Language-Change
2.6-2-Relaunch-PrintFactory-RIP-Software

3.2 Enter Media Size Settings
Click the “Change Media” icon (a white paper symbol, usually representing media or paper settings) above the selected printer.
 : Change Media

3.2-Click-Change-Media-Icon
3.3 Modify the Width Dimension
In the media size settings window that pops up, modify the width dimension.
 : Width
Important: The print width should typically be 20mm less than the actual width of the film to allow for edge margin and avoid printing issues at the edges.
Example: For 330mm film, set the maximum width to 310mm.
Example: For 600mm film, set the maximum width to 580mm.

3.3-Enter-Width-in-Media-Dialog
3.4 Confirm and Save Settings
After making changes, click “OK” at the bottom of the window to save the media size settings, ensuring they are configured correctly.

3.4-Click-OK-to-Save-Media-Size
4.1 Temporarily Add a Job to Access Settings
Click the “Add job” icon .
.
In the upper left corner of the PrintFactory software interface. In the file selection window that pops up, click the “Close” button directly (no need to select a file).
Note: This action aims to activate some preference settings that might only be accessible when a job is present. Some PrintFactory preferences only fully activate and display when the software believes you are working on a “job” or have entered the “layout editing” state.

4.1-1-Click-Add-Job-Icon

4.1-2-Close-File-Dialog-Without-Selecting
Maximize the PrintFactory Layout window to fit the screen.

4.1-3-Maximize-PrintFactory Layout-Window
4.2 Access Preferences Again
Click “Edit” on the PrintFactory menu bar, and select “Preferences” from the drop-down menu.
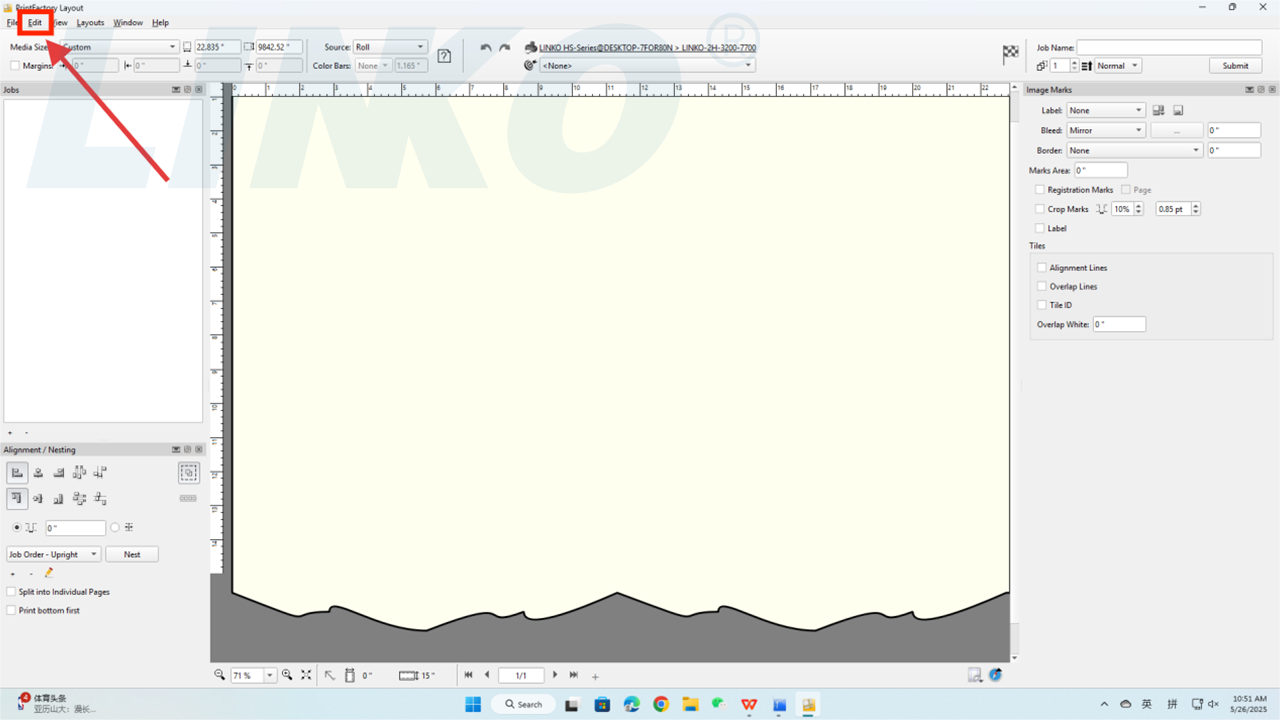
4.2-1-Click-Edit-In-Layout
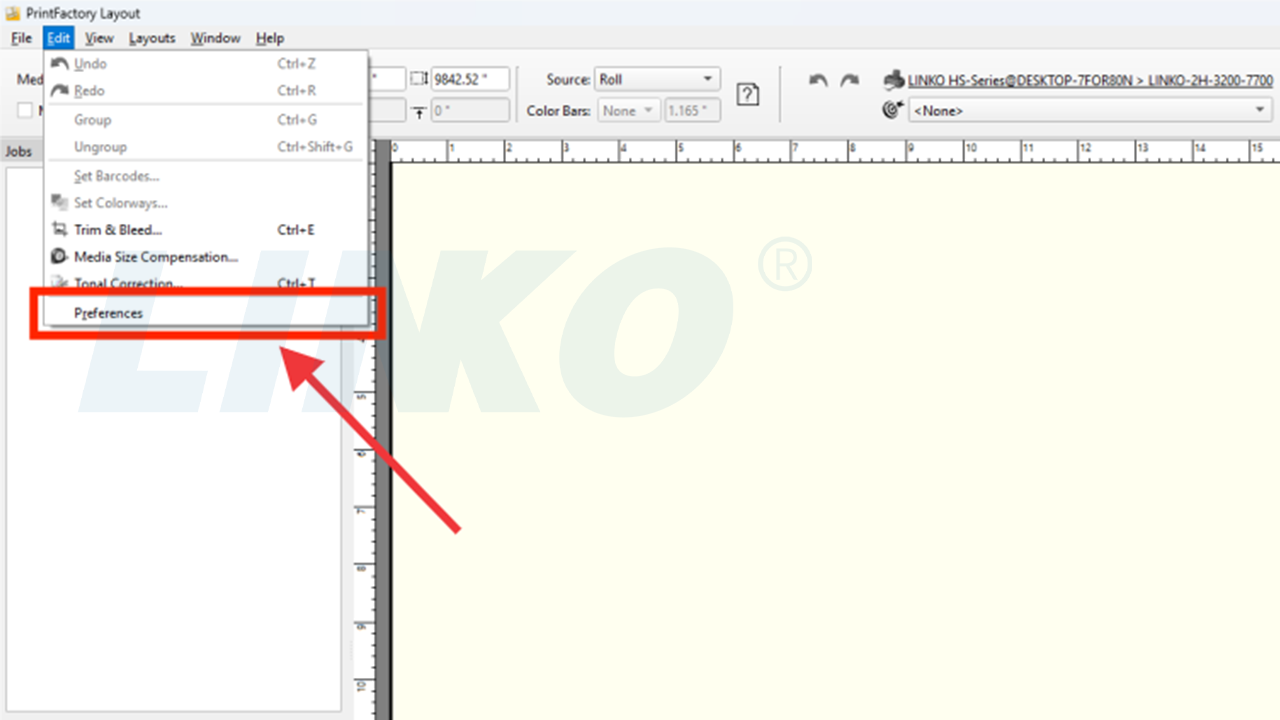
4.2-2-Select-Preferences-In-Layout-Menu
4.3 Set Submit Behavior
In the Preferences window, click the “Submit behaviour” tab. From the drop-down options, select “Close”.
Note: This setting determines whether the layout editing page closes automatically after a RIP job is submitted. Choosing “Close” can simplify the workflow, especially when you need to submit multiple jobs consecutively, preventing open windows from accumulating and keeping the interface tidy.

4.3-1-Open-Submit-Behaviour-Dropdown

4.3-2-Select-Close-In-Dropdown
4.4 Set the Default Reference Profile
In the Preferences window, find the “Reference Profile” option. Click its drop-down menu and select “ISO Coated v2 (ECI)“.
Note: The “Reference Profile” acts like a universal “color language standard” for PrintFactory. When your file does not specify a color profile, or when the software needs a generic color conversion baseline, it will use this “Reference Profile”.
Selecting “ISO Coated v2 (ECI)“, a widely accepted industry-standard color profile for printing, means PrintFactory will base its color processing on this high-standard printing color performance. This helps ensure the most accurate color processing possible even when specific file color information is missing.
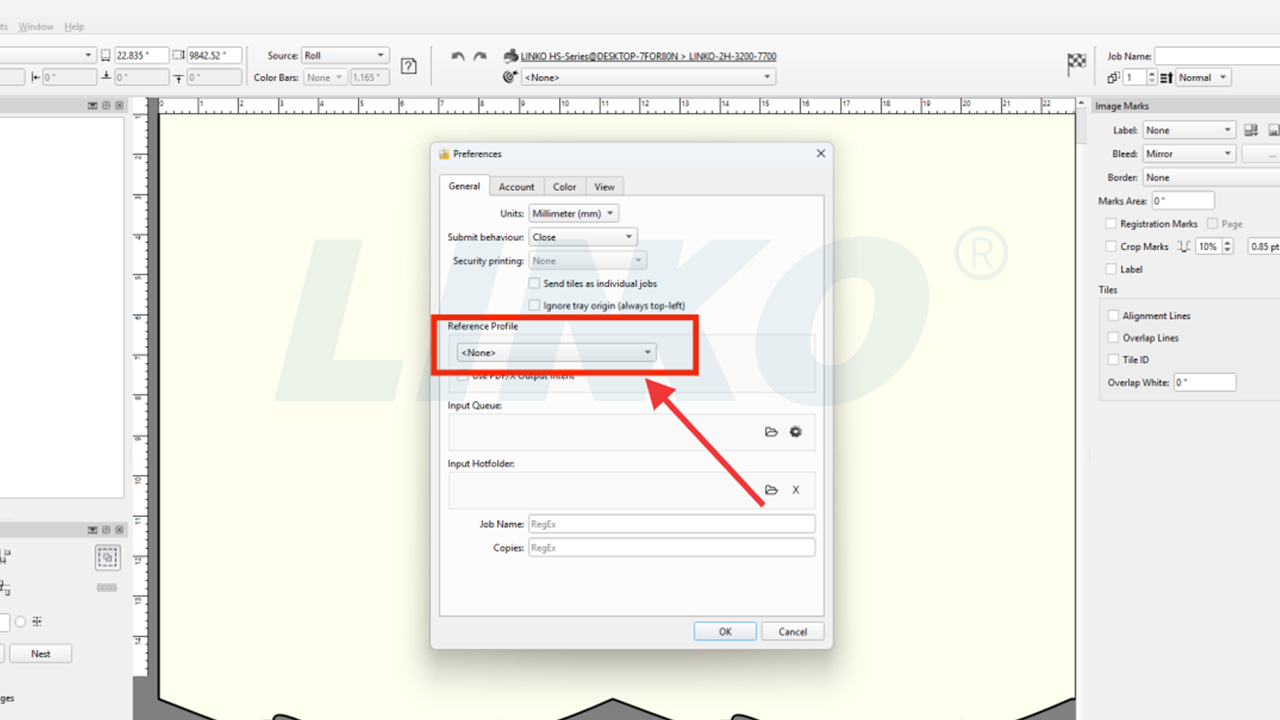
4.4-1-Open-Reference-Profile-Dropdown

4.4-2-Select-ISO-Coated-v2-In-Dropdown
4.5 Configure RGB Image and Vector Color Handling
Most design files (e.g., photos from cameras, images downloaded from the web, or files created in graphic design software) initially use the RGB color mode.
However, printers typically use CMYK inks. Therefore, PrintFactory must convert RGB colors to CMYK. These settings tell PrintFactory how to handle this conversion.
4.5.1 Click the third tab, “Color”, in the Preferences window.

4.5.1-Click-Color-Tab-In-Preferences
4.5.2 Under the “RGB” section:
- Click the drop-down menu next to “Image” (which shows “SRGB IEC61966-2.1” by default) and select “None”.
Note: This means for imported RGB images, PrintFactory will not apply a preset RGB conversion by default, relying instead on the subsequent ICC workflow.

4.5.2-1-Open-RGB-Image-Dropdown
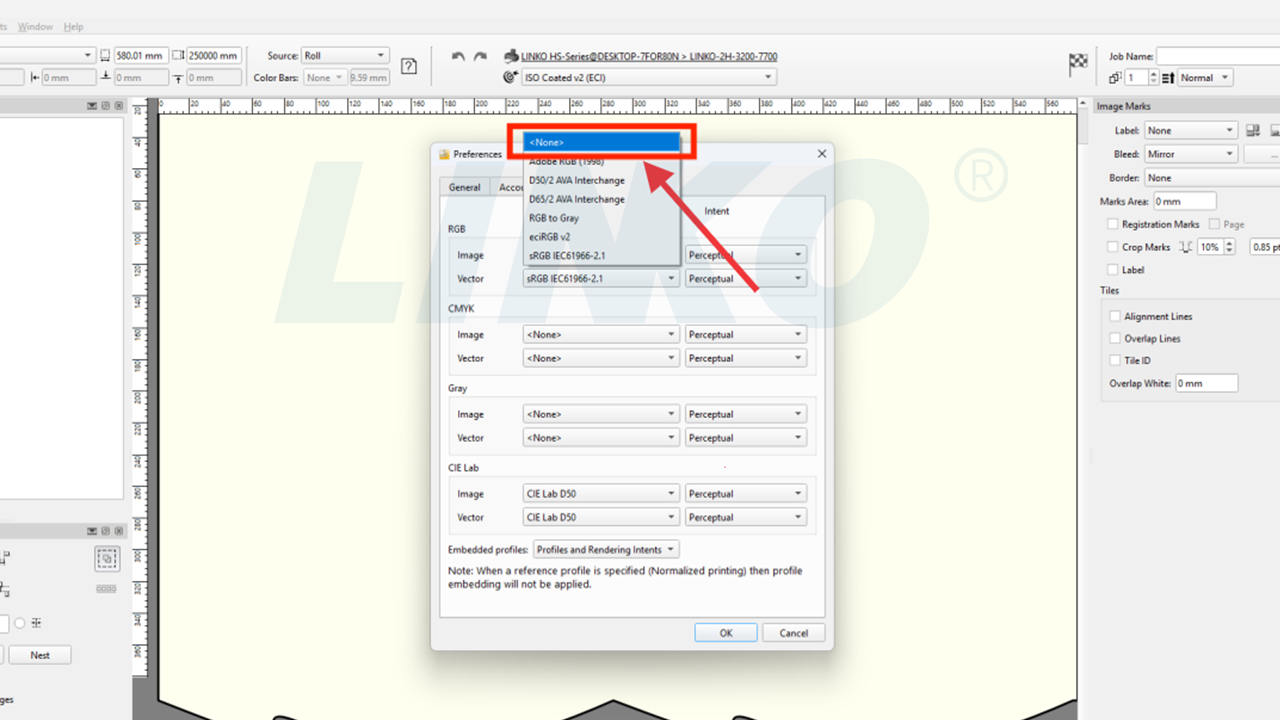
4.5.2-2-Select-None-For-RGB-Image
Click the drop-down menu next to “Vector” (which shows “SRGB IEC61966-2.1” by default) and select “None“.
Note: Similar to images, this means for imported RGB vector graphics, PrintFactory will not apply a preset RGB conversion by default.

4.5.2-3-Open-RGB-Vector-Dropdown

4.5.2-4-Select-None-For-RGB-Vector
4.6 Handle Embedded Profiles
In the “Color” tab, find the “Embedded profiles” option. Click its drop-down menu and select “Remove“.
Note: This setting determines how PrintFactory handles imported files that contain embedded ICC profiles. Choosing “Remove” means PrintFactory will ignore the profiles embedded within the files and uniformly use the workflow and profiles you set up in the software, avoiding conflicts.

4.6-1-Open-Embedded-Profiles-Dropdown
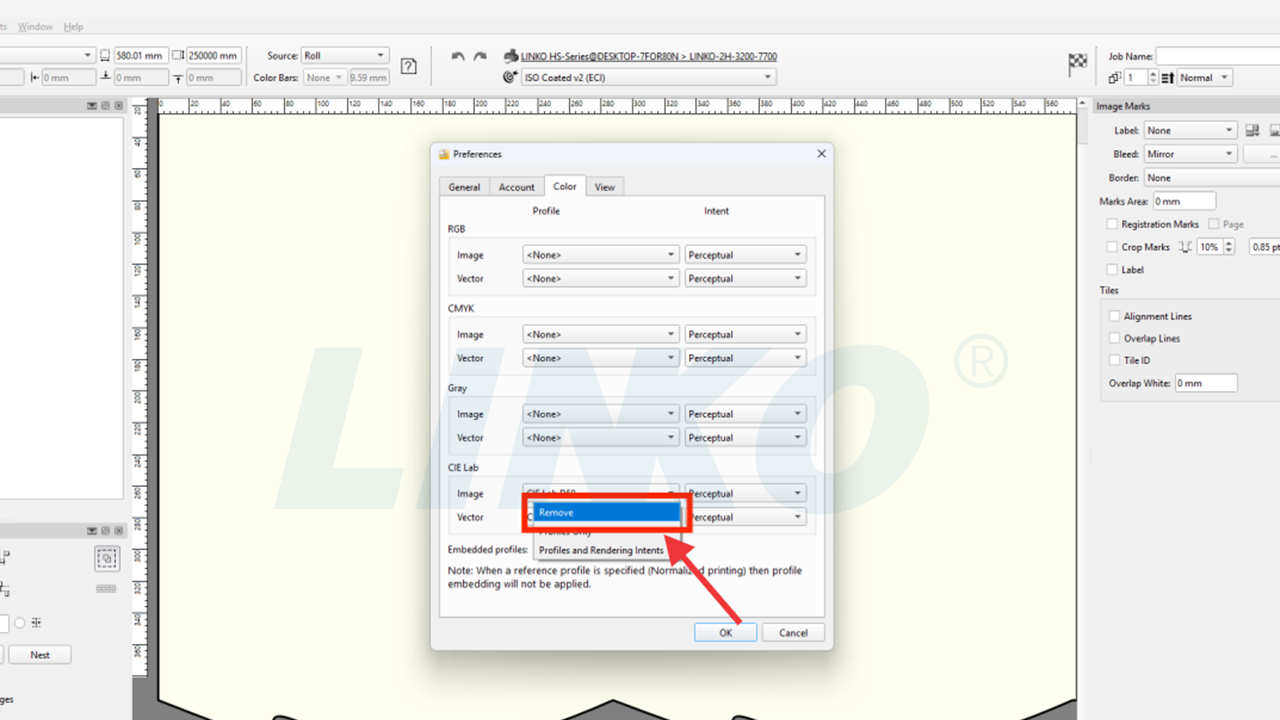
4.6-2-Select-Remove-In-Dropdown
4.7 Confirm All Settings and Exit
Click the “OK” button to save all the above preference settings.
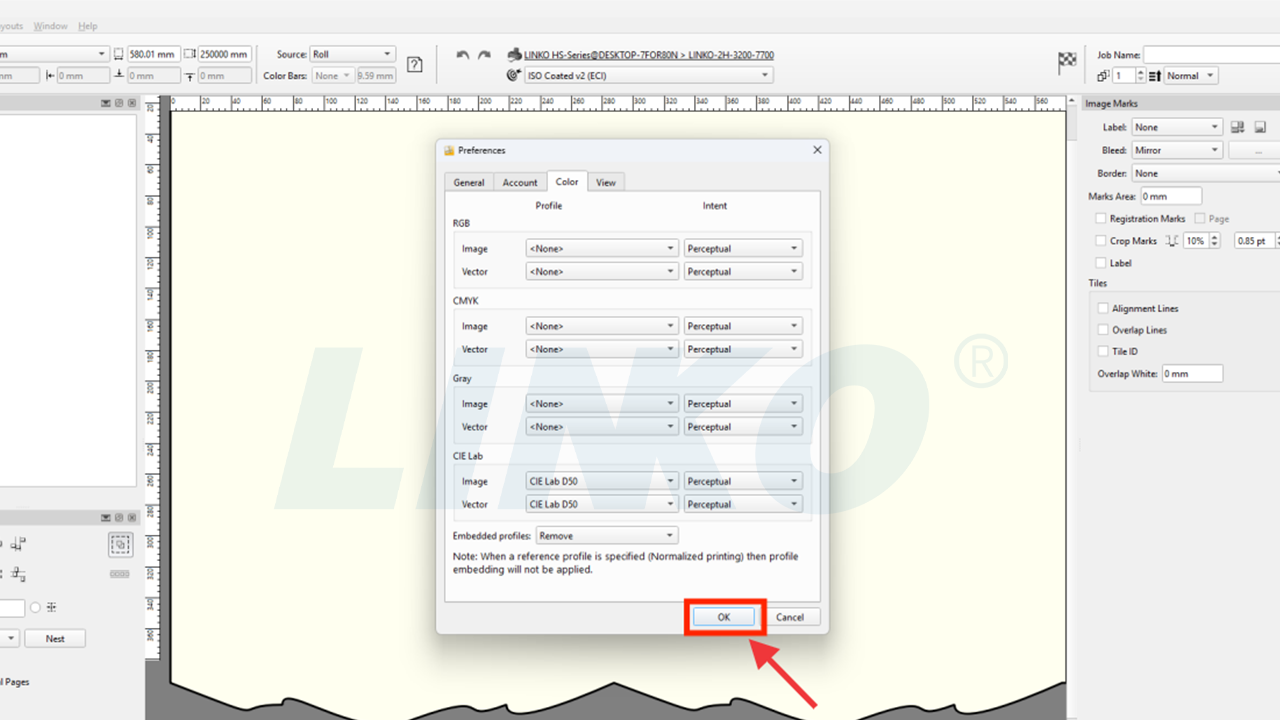
4.7-Click-OK-to-Save-All-Preferences
4.8 Calibrator Default Reference Setting
Click the target icon in the upper left corner of the PrintFactory software interface. Click the word “None” next to it. From the drop-down options that appear, select “ISO Coated v2 (ECI)”.
Note: This ensures that when you perform color calibration or curve fine-tuning, the software uses ISO Coated v2 (ECI) as the default reference standard.

4.8-1-Click-Target-None-Dropdown

4.8-2-Select-ISO-Coated v2-For-Target
4.9 Reference Settings Complete
Global Color Management and Default Behavior Settings (Reference Configuration) are now complete.

4.9-Settings-Complete-Confirmation

5.2 Configure Tool Panel Visibility
In the drop-down menu:
- Uncheck “Marks” (if it is checked).
- Check “White”.
Note: This operation will show or hide the corresponding tool panels in the PrintFactory layout editing interface. Checking “White” will make the white ink settings panel visible, facilitating adjustments to spot color (e.g., white ink) parameters.

5.2-1-Uncheck-Marks-In-Window-Menu

5.2-2-Check-White-In-Window-Menu
5.3 Confirm Interface Update
After completing the settings, you will see the white ink settings panel appear on the interface (highlighted in red).
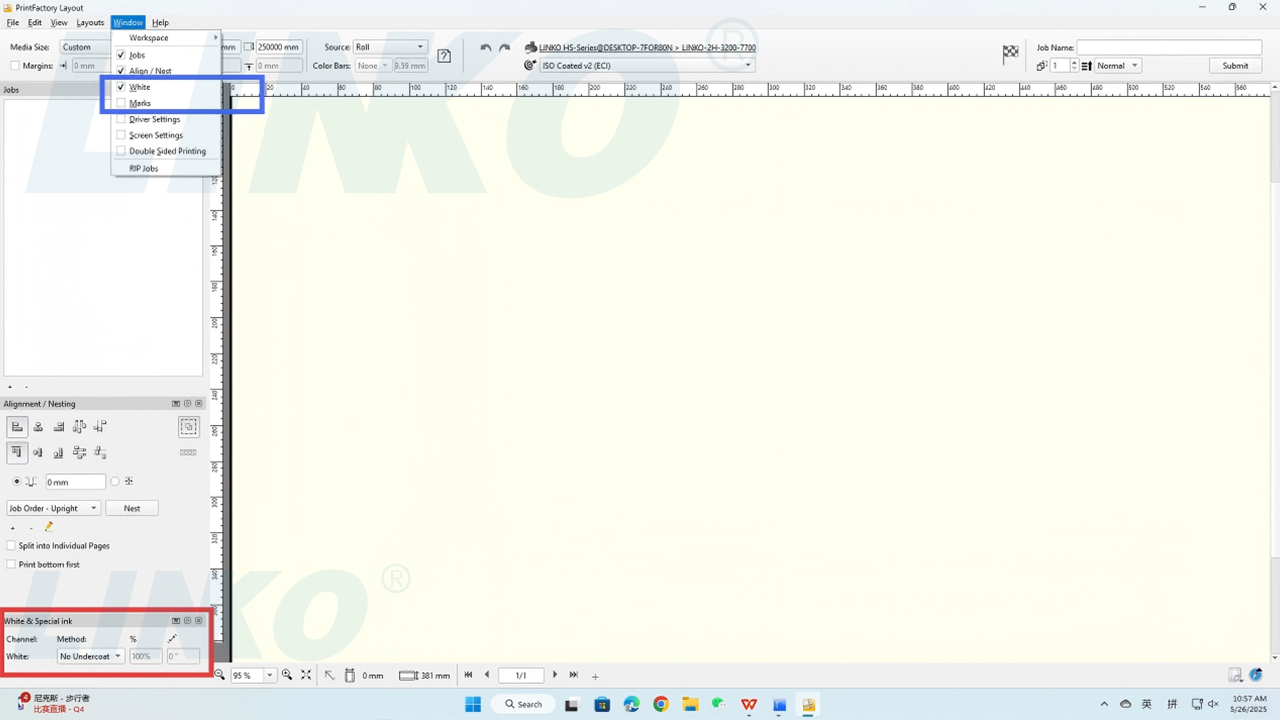
5.3-White-Ink-Panel-Visible-In-Layout
6. Complete All Initial Settings
6.1 Restart the Software for Changes to Take Effect
After completing all initial preference settings, close the PrintFactory software and then reopen it to ensure all changes are fully applied.
6.2 Process Summary
You have now successfully completed the initial setup process for the PrintFactory software!